
Large-scale wall art has moved from gallery-world aspirations to a practical DIY project for homeowners willing to plan carefully. A single oversized piece or coordinated grouping can completely reshape how a living room feels, anchoring furniture layouts, drawing the eye upward, and injecting personality where blank drywall once dominated. The key isn’t buying expensive gallery prints: it’s understanding proportions, measuring twice, and knowing which installation method suits your walls and art type. This guide walks through everything: from sizing and placement fundamentals to sourcing affordable options and hanging them securely.
Table of Contents
ToggleKey Takeaways
- Modern large wall art for living rooms starts at 36 inches wide and works best when it fills 50–75% of wall space to feel intentional and properly anchored.
- The center of your art should hang at approximately 60 inches from the floor (eye level when standing) with 12–18 inches clearance above sofa furniture for balanced proportions.
- Canvas prints remain the most budget-friendly and DIY-friendly option, costing $30–$300 depending on source, while print-on-demand services and big-box retailers offer quality designs that rival expensive gallery pieces.
- Visual balance comes from echoing the art’s color palette in throw pillows, rugs, and accessories—you’re conversing with the piece, not matching it.
- Installation security depends on weight: use two heavy-duty drywall anchors for canvas under 15 lbs, toggle bolts for metal/acrylic prints (20–50 lbs), and stud-mounted bolts for pieces over 50 lbs.
- Measure twice and use painter’s tape to outline layouts before drilling, since careless placement mistakes often reveal themselves immediately and affect the entire room’s visual impact.
Understanding Modern Large-Scale Wall Art
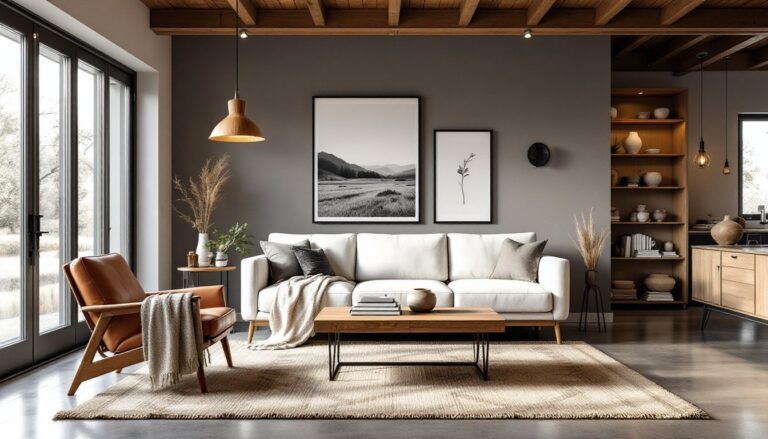
Modern large wall art breaks away from fussy framesets and heavily textured landscapes. Think clean lines, bold colors, geometric shapes, abstract compositions, or minimalist photography, pieces that complement contemporary furniture without demanding visual rest. The sizes that make an impact typically start at 36 inches wide and climb to full-wall installations measuring 8 feet or more. Anything smaller tends to get visually lost on a living room wall, especially if the room has high ceilings or open layouts.
Scale matters more than cost. A $40 canvas from a home goods store installed correctly will outperform an expensive framed piece hung too small or too low. Modern pieces work best when they feel intentional, either dominating one wall or grouped strategically. The aesthetic emphasizes breathing room: don’t crowd the art or cluster smaller prints all around the perimeter.
Popular Styles and Mediums
Canvas prints remain the easiest DIY option: they’re lightweight, come stretched over wood bars, and need only a hook and a level. Metal prints offer durability and a sleek, contemporary edge, though they’re heavier and may require wall anchors. Acrylic prints sit proud of the wall surface, catching light in unexpected ways, pricier than canvas but striking in modern spaces.
Mural-style installations, whether large-format wallpaper, painted geometric patterns, or photo wallpaper, work well for statement walls. Paint is budget-friendly if you’re comfortable with a brush or tape: wallpaper requires measuring, smoothing, and patience but looks finished without additional framing.
Choosing the Right Size and Placement
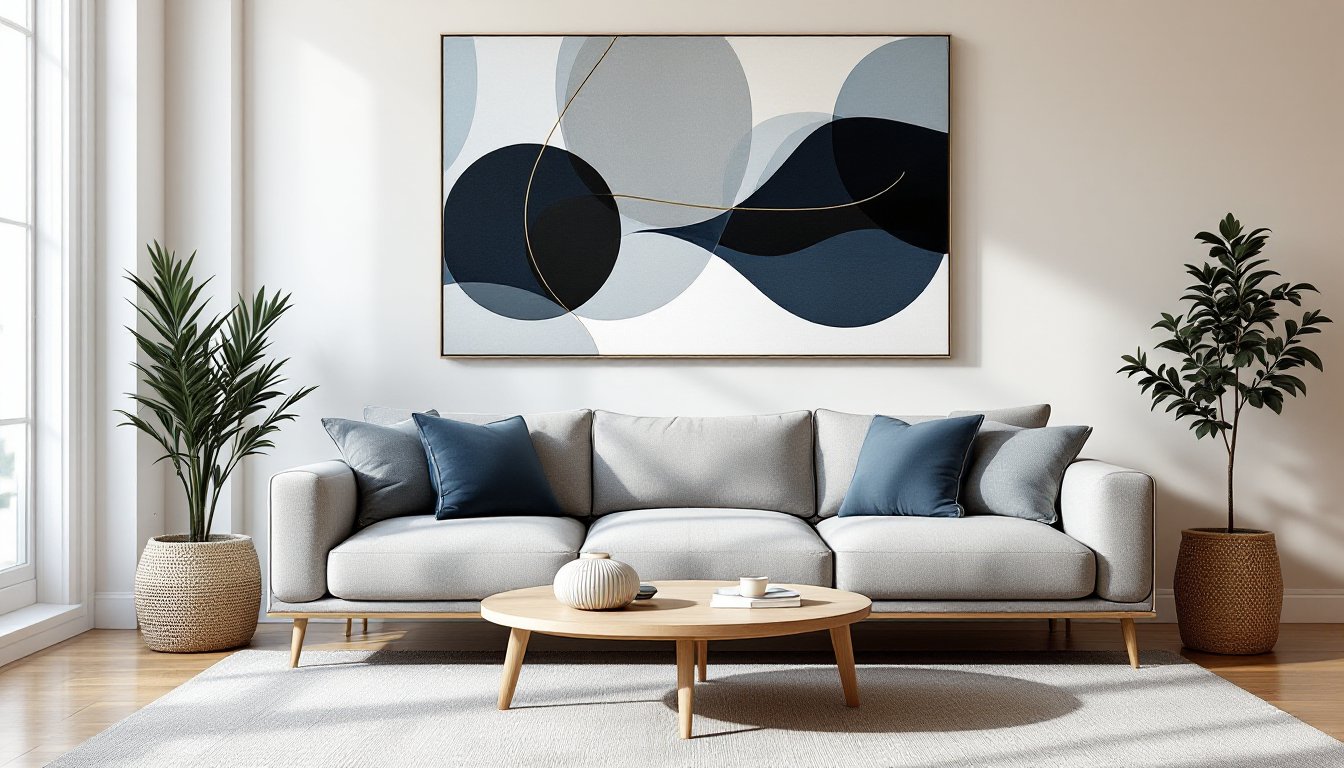
Start by measuring your living room wall in both directions. For a single large piece, aim for art that fills 50–75% of the wall’s usable space, large enough to feel intentional, not so huge that it overpowers furniture or creates an awkward gap to the ceiling. If your sofa is 8 feet wide, a 60-inch-wide print positioned above it will feel balanced without looking cramped.
Height placement is equally critical. The center of the art should sit at approximately 60 inches from the floor, roughly eye level when standing. This is the standard in galleries and homes alike. If the art hangs above a sofa, position it 12–18 inches above the furniture’s back, no closer or the proportions feel cramped.
For corner groupings or gallery walls, sketch the layout on paper first or use painter’s tape on the wall to outline frames before drilling a single hole. Many DIYers measure, trust their eye, and regret it within hours. Measure again. Most living rooms benefit from leaving at least 6–12 inches of wall space on either side of a large piece, that breathing room keeps the composition from feeling trapped.
Consider the wall itself: is it behind the sofa (a prime spot), across from the seating area (where everyone sees it constantly), or on an end wall? Visibility and sightlines drive placement more than decor rules do.
Creating Visual Balance in Your Living Room
A single large piece can anchor an entire room, but it needs optical harmony with furniture and other elements. If the art features cool tones (blues, grays, blacks), echo those in throw pillows, a rug, or a side table. If it’s warm (oranges, reds, golds), repeat that warmth elsewhere, but subtly. You’re not matching: you’re conversing.
Massive abstract or geometric art pairs naturally with minimal furniture and clean lines. Detailed or photographic work can handle richer textures and layered decor without feeling chaotic. Position the art so that when someone sits on the primary seating, their eye naturally lands on it without craning upward. A low, wide sofa and high-hanging art create visual discord: a taller furniture arrangement with proportional art feels resolved.
Color counts heavily. Modern design sites like Domino feature room tours that demonstrate how artwork orchestrates entire color schemes. You’re not just hanging a picture: you’re setting the room’s mood. A single bold, minimalist print can simplify and elevate a cluttered space, while a softer, more narrative piece can warm a cold, sterile room. Trust the art to guide your other choices, pillows, throws, even paint refresh, rather than cramming it into an already-finished scheme.
Lighting amplifies impact. A well-aimed picture light or ambient glow transforms how art reads. Harsh overhead fluorescents flatten modern pieces, while warm, indirect light makes them breathe.
Budget-Friendly Options for DIY Projects
Professional gallery art easily costs $500–$2,000 for a piece worth hanging. DIYers can achieve stunning results for a fraction of that.
Canvas and print options:
• Print-on-demand services (Etsy, Minted, Society6) let you upload personal photos or source design templates at $50–$300 for large sizes. Turnaround is 1–2 weeks.
• Big-box home stores (Target, Wayfair, Amazon) stock pre-stretched canvas prints from $30–$150 in modern designs. Quality varies: read reviews before ordering.
• Local art schools and universities sometimes sell student work or faculty pieces at modest prices. You’re supporting artists and funding programs.
DIY creation approaches:
• Oversized canvas + acrylic paint gives total control. A 4×6 ft canvas costs $50–$80, paint another $20–$40. This works for geometric patterns, color blocks, or abstract washes. Requires steady hands and practice: consider a test run on poster board first.
• Printed oversized posters mounted to stretched frames: print a digital file at a local print shop (often cheaper per square inch than online), then stretch it over wood bars (available at craft stores) using upholstery staples and a basic staple gun.
• Wallpaper murals on one accent wall run $50–$200 depending on size and source. Application is fussy but learnable with patience and a helper.
Interior design resources like MyDomaine offer decorating guides that showcase budget-friendly transformations. The difference between a $1,000 room refresh and a $100 one often comes down to intentional art placement, not price tags.
Sourcing and Installing Your Wall Art
Once you’ve chosen your piece, installation hinges on weight and wall type.
Wall anchors and fasteners:
• Canvas prints (typically under 15 lbs): Two 16-gauge finishing nails driven into wall studs is ideal. If studs don’t align with your layout, heavy-duty drywall anchors rated for 25+ lbs each work reliably. Never trust a single anchor on large pieces.
• Metal and acrylic prints (20–50 lbs): Use toggle bolts or lag screws into studs. For plaster or older walls, verify structural integrity first: damaged plaster won’t hold weight safely.
• Very large installations (50+ lbs): Find studs with a stud finder (a $20 investment pays for itself in peace of mind) and use 3/8-inch bolts with washers. Two attachment points minimum: three if the piece spans more than 4 feet.
Hanging checklist:
- Locate studs and mark with pencil. Use painter’s tape if necessary: it won’t damage paint.
- Measure and mark the center point where your art will hang.
- Draw a level line at 60 inches from the floor (or your chosen height).
- Install hardware and double-check level before hanging.
- Step back and check sightlines from the primary seating area.
- Use a torpedo level, not your eye. Eyes deceive. Crooked art catches everyone’s attention for the wrong reasons.
Material-specific notes:
• Stretched canvas: Hooks should sit just under the top bar’s edge, distributing weight across two points.
• Framed pieces: Check the back for a wire or sawtooth hanger: rated capacity is stamped on hardware.
• Wallpaper or murals: Prime the wall if going over existing paint: use a quality adhesive and a straightedge (or plastic smoother) to eliminate bubbles as you apply. Seams disappear if done carefully.
For large or structural concerns, loading-bearing walls, unusual finishes, or pieces over 75 lbs, consult a local contractor or handyperson. Home design platforms like Homedit provide installation inspiration but always verify load ratings for your specific wall condition.
Conclusion
Modern large wall art isn’t a luxury, it’s an accessible way to reshape a living room’s entire presence. Measure carefully, source thoughtfully, and install securely. The difference between a mediocre result and a showstopping installation usually comes down to honest prep work and not rushing the hanging. Start now: your space is waiting.