

Open concept living has become the standard in modern homes, but the transition where kitchen meets living room deserves more thought than most homeowners give it. That hardwood in the kitchen doesn’t magically blend into the laminate in the living room without a plan. A well-executed floor transition doesn’t just look polished, it hides gaps, accommodates slight height differences between materials, and protects the edges of your flooring from daily wear. Whether you’re working with existing floors or installing new ones, understanding how to bridge these zones makes the difference between a renovation that looks rushed and one that feels intentional. This guide walks you through the options, design principles, and installation steps to get it right.
Table of Contents
ToggleKey Takeaways
- A well-executed floor transition between your kitchen and living room prevents tripping hazards, hides gaps caused by material expansion, and protects flooring edges from daily wear.
- T-moldings, reducer strips, and stair-nose trim are the most common floor transition solutions, with material choices ranging from wood and aluminum to vinyl, stone, or seamless large-format planks.
- Secure thresholds with both construction adhesive and fasteners spaced every 6 inches to prevent lifting caused by seasonal floor movement and moisture changes in kitchens.
- Design-first approaches like large-format flooring, consistent board direction, and strategic lighting can create subtle transitions that feel intentional rather than purely functional.
- A 1:12 slope transition accommodates wheels and walkers while remaining subtle, and should be routed into the subfloor during installation rather than retrofitted for best results.
- Proper installation requires dry-fitting before adhesive application, filling and sanding cured gaps within 24 hours, and allowing at least 48 hours of dry time before heavy foot traffic.
Understanding Floor Transitions In Open Concept Spaces
Why Floor Transitions Matter
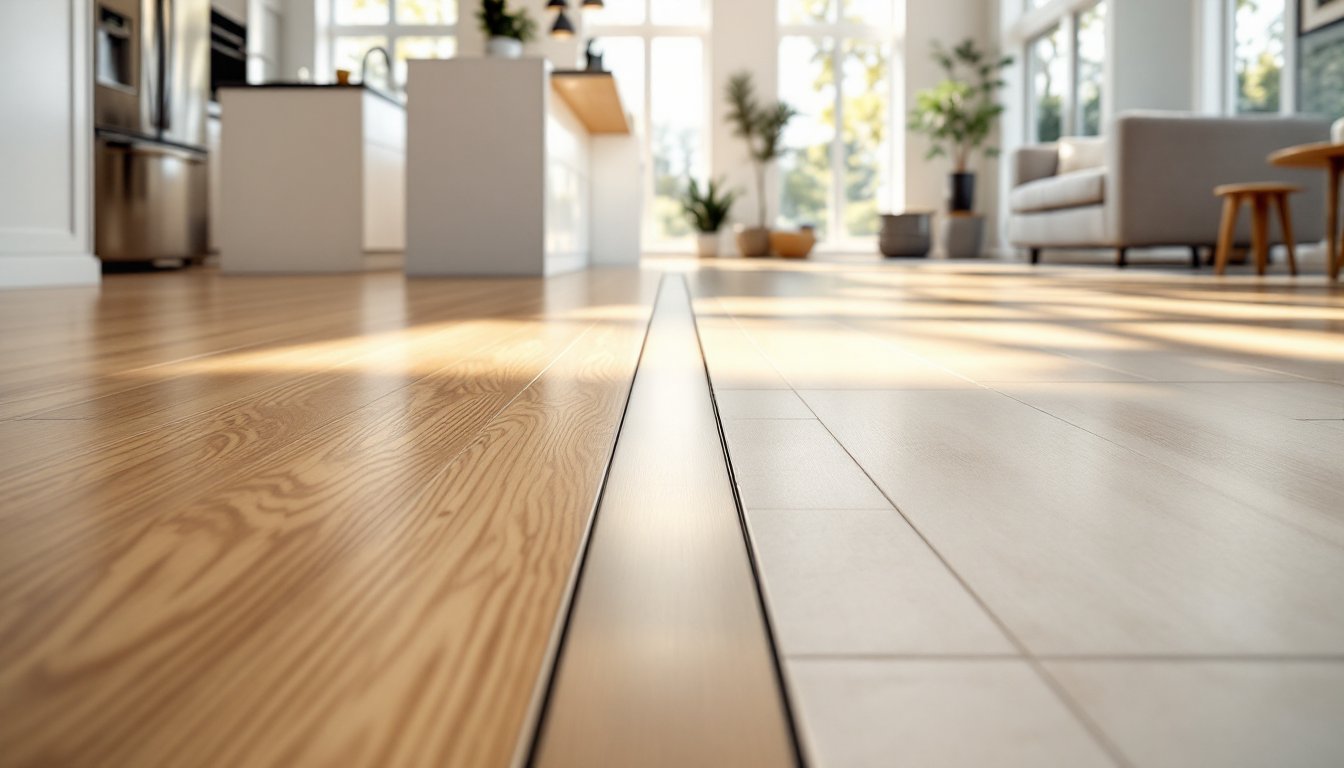
When two different flooring materials meet, hardwood to tile, vinyl to laminate, you’re dealing with both visual and practical challenges. Different materials expand and contract at different rates depending on humidity and temperature. A wood floor in the kitchen might shrink in winter, creating a gap where it meets the living room tile. Without a transition piece, that gap becomes a tripping hazard and a dust collector.
Designers often overlook transitions because they’re details, not statement pieces. But your eye catches them instantly when they’re missing or sloppy. A proper transition should be nearly invisible when you’re looking at the room but noticeable enough to prevent stumbling when you’re walking across it. The goal is to create a smooth, continuous visual line that lets the eye travel from kitchen to living room without jarring stops.
Popular Floor Transition Materials And Techniques
Threshold Strips And Trim Options
Threshold strips are the most common solution and come in multiple forms. T-moldings work when both floors are the same height: they’re shaped like a T and sit in a channel routed into both flooring materials. Reducer moldings handle a drop of 1/8 to 1/4 inch, common when tile (thicker) meets laminate. Stair-nose trim has a finished edge that extends up slightly, ideal for visual definition.
Materials range widely. Solid wood thresholds match hardwood floors but require finishing and can swell in humid kitchens. Aluminum thresholds are durable and don’t absorb moisture: they work with almost any flooring type but look industrial if not chosen carefully. Vinyl thresholds are budget-friendly and flexible but wear visibly over time. Marble or stone thresholds add luxury but cost more and require professional installation if load-bearing.
Installation methods matter as much as the product. Thresholds secured with adhesive alone may lift over time, especially in kitchens where moisture and floor movement are constant. Screwing thresholds down, with fasteners spaced every 6 inches, provides security, though you’ll need to fill screw holes if visible. Pre-finished thresholds save time: unfinished ones let you match stain or paint exactly but demand extra work.
Another option is a seamless transition using materials that visually blend, like matching tile or large-format planks that extend through both zones. This requires planning during material selection and careful layout but eliminates the trim entirely for a truly modern look.
Design-First Approaches For Subtle Transitions
If you want transitions that feel intentional rather than functional, think about visual continuity first. Large-format flooring, 18×36 inch planks or bigger, creates fewer visual breaks, making transitions less jarring even without trim. Running boards in the same direction through both zones ties spaces together better than changing direction at the kitchen-living room line.
Color choices matter as much as material. A hardwood kitchen that shifts to a complementary but distinct living room floor reads cleaner than an awkward mismatch. Designers often choose warm wood tones for kitchens (easier to hide spills) and cooler or neutral tones for living rooms (reads larger, more formal). The transition piece itself becomes a design accent, in brass, dark metal, or a contrasting wood, rather than trying to hide it.
Height differences get solved with sloped transitions. A 1:12 slope (a drop of 1 inch over 12 inches of length) is subtle enough not to feel like a ramp but gentle enough that wheels, walkers, and wheeled furniture roll smoothly across. This works best when you can route it into the subfloor during installation, not as a retrofit.
Lighting also defines zones without a hard visual break. A change in ceiling height, a pendant over the kitchen counter, or recessed lights in the living room area all help separate spaces while the flooring transition stays soft and minimal. Open concept design guides often emphasize this layered approach to zoning.
Step-By-Step Installation Guide For Floor Transitions
Tools And Materials You’ll Need
Materials:
- Transition molding or threshold (measured to span the opening)
- Construction adhesive (polyurethane or MS polymer, rated for your flooring types)
- Fasteners (1.25-inch stainless steel screws or stainless finish nails, if needed)
- Caulk or filler (color-matched to threshold)
- Saw (miter or circular) for cutting to length and angle
Tools:
- Miter saw or circular saw with fine-tooth blade
- Drill-driver with bits (for pilot holes)
- Measuring tape and pencil
- Carpenter’s square or speed square
- Clamps to hold molding while adhesive sets
- Trowel or spreader for adhesive
- Caulk gun
- Safety gear: goggles, dust mask, work gloves
Step 1: Measure and prep the opening. Remove old trim carefully so you don’t damage the subfloor or existing flooring edges. Clean out debris, dried adhesive, and dust with a vacuum and damp cloth. Measure the width of the opening in at least three places: flooring gaps are rarely perfectly straight. Cut your threshold 1/16 inch shorter than the widest measurement so it fits without forcing, which can cause buckling.
Step 2: Dry-fit the threshold. Set it in place without adhesive to check fit and test the height transition. If it’s a reducer or T-molding with a routed channel, make sure both flooring materials sit properly in their slots. Adjust or sand edges if they bind. The threshold should sit flush with both floor surfaces, not high or low.
Step 3: Apply adhesive. Spread a 3/16-inch bead of construction adhesive on the bottom of the threshold using a caulk gun or trowel. Press the threshold firmly into place, using a rubber mallet if needed. Apply light pressure evenly so adhesive squeezes up around edges. Wipe excess immediately with a damp cloth.
Step 4: Secure with fasteners (optional but recommended). Once adhesive is tacky, usually 10-15 minutes, drill pilot holes through the threshold into the subfloor or stringers below, spaced every 6 inches. Countersink 1.25-inch screws so heads sit just below the surface. This prevents the threshold from lifting as floors move seasonally. If the threshold has a finished surface, consider pocket holes or concealed fasteners rather than visible screws.
Step 5: Fill and finish. Once adhesive fully cures (check the product, typically 24 hours), fill any visible gaps or screw holes with color-matched caulk or wood filler. Sand filler flush with a 220-grit sanding sponge once dry. If the threshold is unfinished wood, sand with 120-grit, stain to match adjacent flooring, and seal with polyurethane. Interior design experts often recommend waiting for full adhesive and finish cure before heavy foot traffic.
Step 6: Test and protect. Walk across the threshold several times at different angles, toe-first, heel-first, at a slant. Listen for squeaks or movement. Squeaks mean fasteners aren’t tight or adhesive hasn’t set properly. Place felt pads under furniture legs near the threshold to prevent denting as the floor settles. Keep the area dry for at least 48 hours after completion.