
Your living room walls are the largest canvases in your home, yet they’re often left blank or decorated haphazardly. A well-decorated living room wall doesn’t just look good, it ties your space together, sets the mood for gatherings, and reflects who you are. Whether you’re starting from scratch or refreshing a tired space, the right wall decoration ideas can transform your room into a warm, inviting retreat. This guide walks you through practical approaches to living room wall decoration, from foundational paint choices to gallery displays, shelving, textiles, and accent treatments. Each method is explained with honest advice on what works, what requires skill, and what you can tackle yourself this weekend.
Table of Contents
ToggleKey Takeaways
- Start your living room wall decoration with a solid paint foundation by testing color samples on large patches and considering your room’s light direction before committing to a full paint job.
- Create visual impact with gallery walls by using a loose grid layout centered at 57–60 inches from the floor, limiting frame styles to two or three complementary finishes, and laying frames flat to plan spacing before drilling holes.
- Install floating shelves securely into wall studs with properly rated brackets (at least 50 pounds), and decorate them in intentional groups of three items with plenty of negative space to avoid a cluttered appearance.
- Add warmth and texture with large textile pieces or tapestries (4–6 feet wide) hung with sturdy rods and brackets, which also provide acoustic benefits by absorbing sound in rooms with hard surfaces.
- Use accent walls painted in deep jewel tones or feature treatments like shiplap to define your living room’s energy, but always test colors with a quart sample and prioritize thorough wall prep before painting bold colors.
Paint and Color: Set the Foundation for Your Living Room Design
Paint is the quickest, most affordable way to establish your living room’s personality. Before you crack open a can, spend time with color samples. Paint a 2-foot-by-3-foot test patch on your wall and live with it for a few days, different lighting, times of day, and existing furniture will shift how a color reads.
Consider the room’s natural light. North-facing rooms benefit from warm, creamy neutrals or soft warm grays. South-facing spaces with abundant light can handle deeper tones, charcoal, navy, or forest green, without feeling cave-like. East and west-facing rooms sit in between, so bolder accent colors often work well here.
Standard interior latex paint covers about 350 square feet per gallon at one coat. Most living rooms need two coats for even coverage, especially when moving from a darker or heavily marked wall to a lighter color. Before painting, prep is non-negotiable: fill holes with spackling compound, sand any glossy surfaces dull with 120-grit sandpaper, and use painter’s tape along trim and ceiling lines.
Wear safety glasses, a dust mask (or respirator if sanding), and gloves. Stir the paint thoroughly and apply with a quality brush or roller, cheap tools shed bristles and lint. Paint one coat, let it dry per the can’s instructions (usually 2–4 hours), then apply a second coat for solid coverage. Don’t rush this step: it’s the foundation everything else sits on.
Wall Art and Gallery Displays: Creating Visual Impact
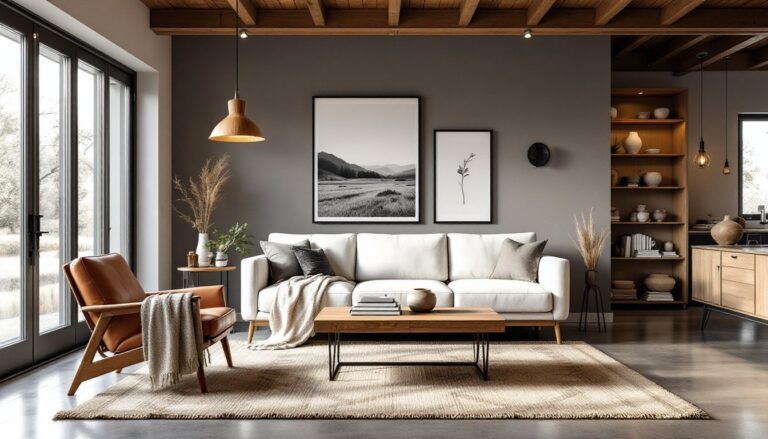
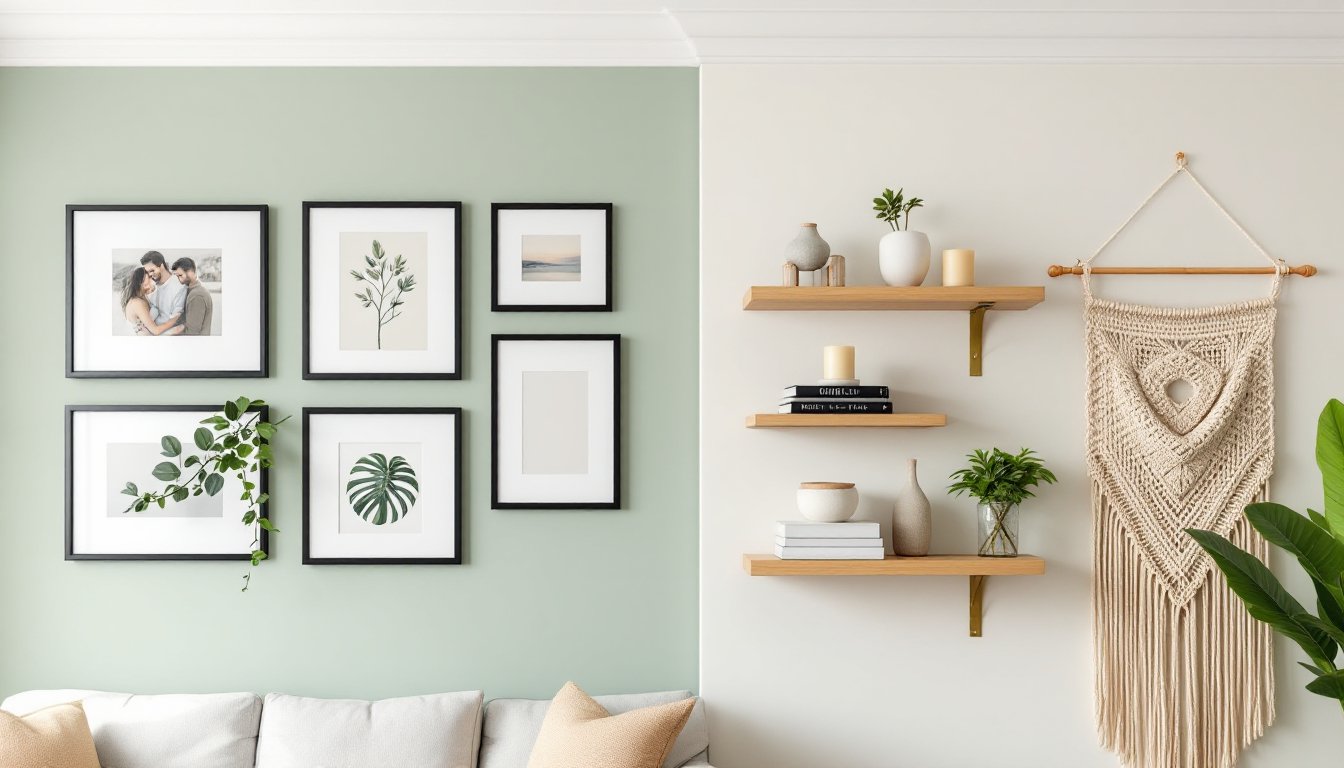
Once your paint is set, artwork becomes the star. A single large piece (36 inches or wider) can anchor a sofa wall, while a gallery wall of mixed sizes adds personality and visual interest. The key is intentional arrangement, random placement reads cluttered, not curated.
Gallery walls work best when you follow a loose grid: decide on a center point, usually at eye level (57–60 inches from floor to center), and build outward. Lay your frames flat on the floor first, measuring gaps and spacing before you drill a single hole. Use a stud finder to locate wall framing, then install heavy-duty picture hooks (rated for 25–50 pounds depending on frame weight) rather than plain nails: they won’t slip and rip drywall.
For a cohesive look, limit your frame styles to two or three complementary finishes, say, black, natural wood, and brushed brass. Art itself can be mismatched: family photos, prints, botanical illustrations, and even 3D objects (shadow boxes, woven wall hangings) work together if the frames unify them. Large interior design publications like House Beautiful regularly feature gallery wall inspiration that translates well to residential spaces.
Mix and Match Artwork for Personal Style
Personal taste beats “rules,” but a few guidelines prevent visual chaos. Mix scales, pair large prints with smaller pieces to create rhythm. Vary subject matter: alternate abstract prints with figurative work, landscapes with portraits. Color cohesion matters: either pull accent colors from your paint, furniture, or textiles, or go neutral (black, white, grays) to let the art dominate.
Frame matting adds breathing room around artwork and adapts mismatched piece sizes. A mat cutter and Logan mat kit ($40–$80) lets you cut custom mats at home: otherwise, a framing shop handles it affordably. Don’t overlook unconventional pieces, vintage maps, fabric prints, even woven textiles hung like art add depth and character that mass-produced prints can’t match.
Shelving and Floating Storage: Functional Wall Decoration
Floating shelves do double duty: they store and display, plus they’re genuine projects worth doing right. Improper installation is the #1 reason floating shelves sag or fail, so this isn’t a corner to cut.
Most floating shelves require mounting into wall studs (or using heavy-duty anchors into solid drywall). Find studs with a stud finder and mark them lightly in pencil. Shelves are typically 24–36 inches wide and need support every 16 inches of span. For a 24-inch shelf, one centered ¾-inch steel bracket (rated for at least 50 pounds) works: longer shelves need two or three brackets, spaced evenly.
Mark bracket holes, then carefully drill pilot holes (slightly smaller than your bracket bolts). Install brackets level, a laser level is worth the $20 investment here: it beats squinting at a bubble level. Slide the shelf onto the brackets and secure from underneath if the design allows. A 1-inch-thick solid wood or plywood shelf holds better than thin particle board: thinner materials look flimsy anyway.
Decorate shelves with purpose. A shelf crammed with every item looks cluttered. Instead, group items in threes: pair a framed photo with a small plant and a decorative object (book, candle, sculpture). Leave breathing room, and let the negative space do work. If your shelves hold books, orient some spines out and lay others flat with an object on top to break up the pattern.
For renters or those hesitant about wall damage, adhesive-backed floating shelves are available, though they’re lower-weight and less permanent. They’re fine for lightweight decor but won’t handle book collections.
Textiles and Tapestries: Adding Warmth and Texture
Tapestries, woven wall hangings, and textile art bring immediate warmth and personality without the commitment of paint. A large textile piece (4–6 feet wide) hung above furniture creates a dramatic focal point. Macramé, woven cotton wall hangings, and quilted textile art all work: the key is scale. A small 2-foot tapestry on a large blank wall looks orphaned, but the same piece centered above a console or chair feels purposeful.
Hang textiles using a sturdy rod (wood, metal, or rope) attached to the wall with brackets rated for the fabric’s weight. A 3-inch-diameter wooden dowel and simple L-brackets work for most lightweight pieces. For heavier quilts or woven tapestries, use a metal curtain rod with appropriate wall brackets. Space brackets 6–8 inches from the top and 4–6 inches from the side edges.
Textiles add acoustic benefits too, a woven wall hanging absorbs sound, softening echoes in rooms with hard surfaces. Pair one large statement textile with solid walls, or combine several smaller pieces in a grid arrangement. Layer textures: a flat linen hanging next to a chunky macramé piece adds visual interest.
MaintenanceMatters: Dust textiles monthly with a lint roller or soft brush. For washable fabrics, gentle hand washing in cool water works: check care tags first. For delicate or dyed pieces, vacuuming with a screen between the nozzle and fabric prevents damage. Rotate textiles annually to minimize sun fading.
Accent Walls and Feature Treatments: Making a Statement
An accent wall, a single wall painted a bold or contrasting color, can define a living room’s energy without overwhelming the space. The best accent wall is often the one you see first when entering the room, or the wall opposite windows (where light amplifies the color).
Before committing, order a quart of your chosen color and paint that test patch again. Deep jewel tones (emerald, sapphire, burgundy) feel luxurious but can shrink a small room. Matte or eggshell finishes (vs. glossy) minimize wall imperfections and look more sophisticated. For accent walls, don’t skimp on prep, a flawed wall looks worse in bold color.
Beyond solid color, consider textured finishes or feature treatments. Shiplap creates a cottage aesthetic: it’s essentially thin boards (¾ inch thick, 6–8 inches wide) installed horizontally with slight gaps between them. Installation requires a stud finder, a nail gun (rental: $20–$30/day), and careful measurement, it’s doable for handy DIYers but can be finicky. Peel-and-stick shiplap is a renter-friendly alternative, though it’s less durable and harder to remove cleanly.
Wallpaper offers pattern and texture without construction. Modern peel-and-stick wallpaper is removable and forgiving: traditional wallpaper requires paste and is more permanent. Large-scale patterns work better on accent walls: overall patterns suit all four walls. Resources like Homedit showcase how wallpaper and feature walls are integrated into contemporary living spaces.
Other feature treatments include board-and-batten (vertical wood boards with trim strips), paneling (shiplap, beadboard, or PVC), or even stenciled patterns. These projects demand precision, proper tools, and sometimes a handy friend. If you’re unsure, mock it up with painter’s tape or test sections before committing resources.
Conclusion
Your living room walls don’t need a major renovation to shine. Start with a solid paint foundation, add artwork or textiles that reflect your taste, and layer in functional elements like shelves or feature treatments. The best approach combines what you love with what your space genuinely needs. Honest prep work, measuring, testing, and planning before you pick up tools, prevents costly mistakes and ensures results you’ll enjoy for years. Take your time, trust your instincts, and remember that the most successful living room walls tell your story.